Showing posts with label rehersal dinner. Show all posts

Jan 17, 2012

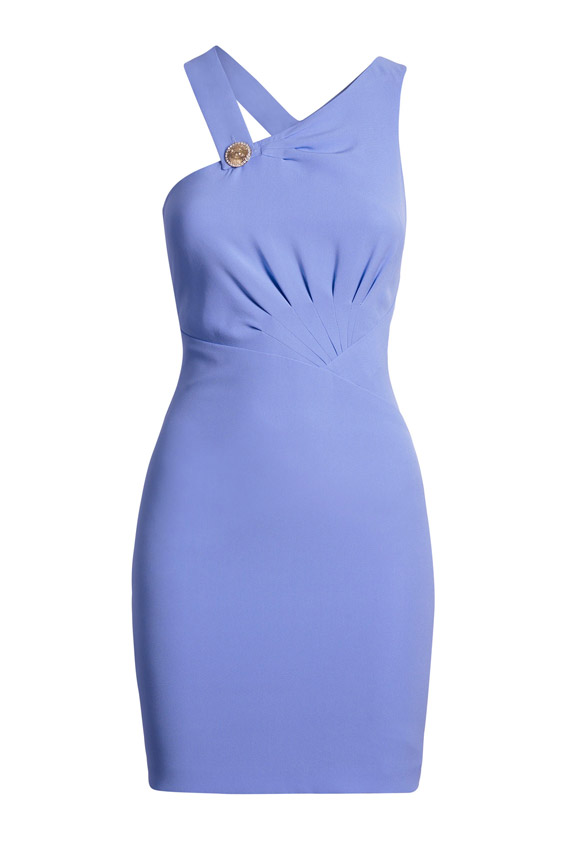
Get ready for Versace at an affordable price

Ever wanted to own something beautiful from Versace, but couldn't justify the price?  Now you can own gorgeous dresses, bathing suits and more from the new collection launching in partnership with H&M.

Clothing goes on sale January 19th, 2012.  You can see the preview collection here.

I'm currently in love with the blue silk dress.  If you're planning on going on a cruise, (read honeymoon) this cruise collection will definitely make you look like a posh celebrity.  Best of all, if anyone asks, you can just tell them it's Versace. :)

Wear this for any hot spring events including bachelorette parties, your rehearsal dinner, and of course, your honeymoon!


Sep 20, 2011

Welcome bags

The wedding is 2 weeks away and I am at the end of my budget. If you're a bride in the same position, but still want your guests to feel taken care of, DIY Welcome bags might be a good option for you.


What's Involved in a Welcome bag?
A good welcome bag should alieve a few questions and problems that guests might run into while attending your event. If people are staying over, it's always a good idea to give them some of the basics to get them through their stay.  A welcome bag can have as many or as few things below as you want to include.  Below are some common things a welcome bag does:
  • It gives guests a little welcome note from the Bride & Groom
  • It provides guests with important phone numbers.
  • It gives an itenerary of what's going on, where and when.
  • It tells guests where they can go to do things in the area
  • It provides snacks so they don't have to pay for anything from their fridge
  • It helps fix pre & post event trama (hangovers, cuts, headaches, stomachaches)
Some brides know all guests are staying over and have their welcome bags go double duty and work as favors as well.  This is a nice thing to give, however I wanted this to be a separate thing for people staying over. Think of your bag as being ingredients to bake a cake.  What do you want that's special to you or matches your wedding theme that would work in the welcome bag?

My Nautical Themed Welcome / Out-of-Town bag Ingredients:
  • Paper lunch bags (yep, just the plain old brown ones you get in a grocery store)
  • A Printer
  • labels (optional)
  • A Welcome brochure - custom made by yours truly.
  • cheddar goldfish
  • swedish fish
  • lifesavers
  • treat bags
  • treat bag toppers
  • Water bottles
  • water bottle labels
  • Green Tea
  • Green Tea packages
  • Hot Cocoa packets
  • Hot Cocoa packet sleeves
  • Ribbon
Instructions:
I designed my own Monogram logo already and created a new file in Adobe Illustrator with the logo, a pretty font that says "Welcome" above the logo and our wedding date under the logo.  I created the artboard size to be the dimensions of a paper bag (I think around 5.25in x 9in).  Modify your working area to match your bag.

Do a test print.  If you printer refuses to take the paper bag and just eats it, move on to printing onto labels and just stick them on the outside of the bag.

Either purchase your own monogramed labels from a company that prints customized products or use printable labels and print them directly from your computer.  Remove the current labels on the bottle and stick these on your water bottles.

I will soon add a teabag template to this site so you can make your own teabag cases.  You could also simply purchase customized teabags to your bags.

Cocoa packet templates will also be available soon.  These are perfect for the fall or chilly winter months.  These can be purchased customized for your wedding as well.

I got my treat bags at Target.  You can get yours here if you need some.  These are little plastic bags perfect for fillings will candy, cookies and other treats.  I filled each bag with either cheddar goldfish, lifesavers or swedish fish.  I made little paper toppers to close up the bags with the title to match the ingredients.  The life savers said "Lifesavers.  Open in case of emergency"  The swedish fish said " Fresh caught Swedish Fish" and the Goldfish said "Goldfish Fish Bait".  You can attach with clear tape or staple the toppers to the bags.

I added my welcome brochure to the bags.  I had custom made these and included important phone numbers (hotel, taxi, hospitals, etc.), great local spots, a link to upload photos, a welcome message for guests and a Hangover helper guide for people recovering from a night of too much fun.  Check out my brochure here

Once you've got all your "ingredients" together, start assembling the bags with your goodies.  Each one of my bags has a welcome brochure, snacks, water, tea & cocoa.  You can also add things like local maps and a postcard.  Fold over the top of your bag and punch a hole.  Tie your ribbon through the hole.  Deliver your box to the hotel front desk and ask that your wedding guests receive their bags during check in.

 Really want guests to feel appreciated.  Provide some food for breakfast the next day or pamper them with a post-wedding bruch at a local restaurant.


Sep 9, 2011

Free DIY template - Best Wishes Bird Garland


From the Feather collection and part 2 of our series giveaway comes another freebee for you.  Our DIY garland template.
Click here to download the garland template.

What you'll need:

How to:
  1. Print two copies of the file on heavy cardstock and cut out the rounds.
  2. Take some crepe paper and fold accordian style around each round from the 1st sheet you cut out so you get a fanned out circle; glue down the crepe paper.
  3. Lay out the letters to say "Best Wishes", then flip them so that the backs are facing you.
  4. Take a piece of satin ribbon and lay it on top of the crepe papered letters; glue the ribbon to the crepe letter.
  5. Place some glue on top of the ribbon on each letter.  Take your matching letter (so "B" with "B", etc.) and place it on top.  You should now have a "letter sandwich"  That is layered letter, crepe paper, ribbon, letter.
  6. Repeat this for all the letters spelling out "Best Wishes" 

Use the Bird circles either in the center of the two words, or print extras to make pretty ribbons to hang or pin onto your Bride-to-Be.
Feel free to embelish these with glitter, rhinestones or anything else you like.

I apologize for the shot above.  I had forgotten a big part of the sign, ribbon.  It was really tough to get the sign to stay put because of it.  make sure you remember to use ribbon instead of string.

Aug 19, 2011

Diy super-cheap Shoe bling

Nina Women's Evelixa-Ls Open-Toe Pump,Ivory,8.5 M USAs you know I've been going wedding shoe crazy. I first didn't want white shoes because I felt, "where the heck will I ever be able to wear white shoes again?" and, "colored shoes would be so fun!"

So I bought two pairs of Nina Shoes (elke) in Navy and Fushia.  The fushia I returned immediately because they were quite purple.  Not even close to the super hot pink I imagined.  The Navy I loved, but was concerned with the heel height.  I still have them, not sure if I should keep them or return them.

Then I heard the screaming from my mother and grandmother.  OMG I can't believe you're going to wear colored shoes, how: ugly, aweful, disgusting, terrible, horrible (insert adjective here).

So I decided to go on another shoe shopping journey to find the perfect shoe.  I ended up falling in love with two more pairs!  (There goes my wedding budget)  The first I loved because it was practical.  It looked like a shoe I could wear with multiple outfits and not look "wedding-like".  That was the Nina Evelixa.  It was Ivory, but I was concerned it would be too light for my dress.  I then found another shoe that I loved in gold.  It had fluffy fabric flowers on the side of the shoe with bling centers!  It was made for me.  I brought both home and the ivory ones matched perfectly, while the gold was, well... too gold.  But I am keeping the gold ones because they are awesome.  How can you say no to a shoe with fluffy flowers with bling centers?

To jazz up my shoes for the wedding I looked online for shoe clips.  Not only are they expensive, they didn't have anything I loved.  I did want a temporary solution to just add the bling for 1 day and didn't want to spend a fortune.  Then it came to me.....

I had recently made a trip to Michaels craft store for some rhinestones and found some cool embelishments in the scrapbooking section that had adhesive backing on a strip.  I had bought ones that had a mix of pearls and rhinestones, but you could get all rhinestones, all pearls or colored rhinestones if you wanted.  The brand I used is called recollections.
Each package cost around maybe $2.  You would only need 1 package to do a pair of shoes.

Simply open the package, pull off a strip of rhinestones/ pearls and place across the center ruffle of your shoe.  The adhesive is sticky enough to feel secure and hold on the shoe for about 1 or 2 uses, but not permenent enough to be stuck on forever, being the perfect fix for ANY pair of shoes you want to spruce up for an event, but don't want it to be permanant.  You are also able to reposition if needed.  Now you can purchase these rhinestones and even wrap you heel with them!

Remember to remove the stickers after you are done with them.  I'm sure that while not permanent, the adhesive could leave a discolored mark on your shoes after a bit of time.

Jun 17, 2011

Sweet Inspiration: Deliciously Different Wedding Menus


Searching for the perfect Menu for my upcoming wedding, I looked for some menus that were different, fun and had a unique flavor all their own. From personalized to pretty, this group of unique menus has it all!

From Top Left to right:
  • This surfboard menu is perfect for a west coast wedding.  You could also use a rowboat to display your menu for a nautical or beach-side wedding. (image: brides.com)
  • These chopsticks inside a printed menu is as functional as it is perfect for an asian wedding (image: brides.com)
  • Chalkboard menus are really hot and trendy right now in displaying a bar, drink, dinner or in this case a Cake Buffet menu. (image:SarahkChen)
  • Think outside the box with a round menu printed in the pretty colors of your wedding or event. (image: brides.com
  • Treat your guests with tropical loveliness by placing a flower on your menu. ( image: mydesignsensations)
  • Printing your menu on a natural paper or burlap with a vintage font and image can give your wedding or event a rustic feel.  Complete the look with string or rope. (image: bridalbuds)
  • Place goodies, treats and surprises inside a brown paper bag printed with a menu.  Perfect for a rustic wedding! (image: tecpetajaphoto)
  • Remember the Cootie Catcher from middle school?  Give guests something fun to do at your table while they're eating! (image: pixelperfectmm)
  • Want to give your guests the grand overview of the day?  Try a booklet menu.  They can get all their information in one handy book. (image: Bella Forte)
  • For something pretty and functional, try printing your menu on the tablecloth guests will be using.  It will add some interest to a basic white tablecloth.  You can also drop your paper printed tablecloth down to overhang under your plates. (image: marthastewart)
  • Want your guests to feel the love?  How better than to give them a heart-shaped menu?  This has a bonus DIY craft for you to follow.  This is also a great craft for a valentine's day party!  (image: ohcrafts)
  • How sweet it is when your menu doubles as your favor!  This couple chose to have their menus printed in chocolate.  What a delicious and sweet idea! (image: styleunveiled)
  • Birds of a feather will flock to this craft.  If you're having feathers or a peacock themed wedding, add a simple feather to your dinner menu for added flair! (image: eventhouseblog)

I hope the board I've created can inspire brides and event planners everywhere to spruce up their boring menu with a little flair.  It doesn't take a lot to add a little pizazz to a basic menu.  Add your colors, a theme or a personal touch and it can make all the difference.

    Jun 2, 2011

    DIY personalized tealight holders

    Want to spruce up basic tealight holders or personalize them for your next event? Here's a quick little how-to video on just that.   This is also a very budget friendly project and something for beginning DIY crafters!

    What you'll need:
    Directions:
    • Make sure your tealight holder is prepped and clean.
    • Wrap your desired ribbon around the tealight and mark off the diameter.  Cut subsequent ribbons the same length.
    • To attach either use glue dots or double sided tape.  For a permanent hold use super glue or a glue gun.
    • You will have seams after wrapping the ribbon around.  To hide these either add some cute detail like buttons, jewelry findings or a paper monogram.  I printed a sheet of monograms I created and attached with double sided tape.

    May 18, 2011

    The perfect rehersal dress

    conie fox dress 2
    While I would love to wear something full length, everything I was in love with ended up being much to formal. I needed the perfect dress for my rehearsal dinner. Not too formal, but not too casual. Something white, ivory or off-white.

    conie fox dress 1
    My first love affair was with one of these two dresses. I felt like both were made with soft flowing fabrics and even though they were long, they felt more casual and beachy.

    The hint of color at the bottom brought them out of "wedding dress territory" and into a more casual day-evening look.

    My only problem was I wasn't sure if I wanted to spend $200+ for these dresses.

    I would most definitely be wearing dress #1 throughout the summer since it feels like such a beach dress.

    The other because of the beading would be a bit harder even though I love it so very much.  It's so beautiful with the blue and purple flowers on the bottom.

    Every short dress I kept finding I didn't like.  They were all so fluffy, poofy or so short I'd be afraid if I moved the wrong way, guests would get a full view.  yikes.

    So what did I end up getting after sifting through hundreds of dresses?  I found this perfect dress.  Not to formal and not too casual with just a hint of bling.

    It actually reminds me of something Kate Middleton would wear.  Sexy, yet chic and timeless.  I love it!

    The best part is, it only cost me $79 bucks!

    London Times dress