Showing posts with label Gifts. Show all posts

Dec 25, 2011

Pretty DIY Project: Kissing crystal

Ever wanted to have mistletoe hanging in your home but felt it looked a little blah?

Today's little project is my blingy take on the traditional hanging mistletoe in your home. It only cost me around $3 to make it too. If you're getting married and having a Christmas themed wedding, this would be a really cute favor to give to guests.

Dec 8, 2011

So In love with Vintage Garters

Emily Riggs Bridal "Vintage"
I spotted these beautiful lace and rhinestone bridal garters today and fell in love.

If you're sick of all the cheap polyester mass-produced garters (probably from a sweatshop in China) that you find everywhere, this is a lovely change.

Emily Riggs Bridal "Trousseau"
The site also has other lovely lace and jewel encrusted baubles for you to wear on your special day. 

Dec 3, 2011

DIY Christmas gift - Festive Pin-up girl plates

Two Completed Plates
Hi All,

Tis' the season for going broke buying those gifts for everyone....not!

To bring back the spirit of the season I'm making gifts for as many people as I can to give something personal and special (and of course fun)!

My 4 Ready to Go Christmas Pin-Up Designs


For my cousin that I love dearly, I decided to make her festive vintage pin-up girl plates. I know she will go crazy for them. I wanted to make her some festive plates because I know she loves entertaining guests and loves things that are fabulously girly (read feathers, glitter & bling) and I knew pin-up girls with fun sayings would make her squeal for joy.

Sep 20, 2011

Welcome bags

The wedding is 2 weeks away and I am at the end of my budget. If you're a bride in the same position, but still want your guests to feel taken care of, DIY Welcome bags might be a good option for you.


What's Involved in a Welcome bag?
A good welcome bag should alieve a few questions and problems that guests might run into while attending your event. If people are staying over, it's always a good idea to give them some of the basics to get them through their stay.  A welcome bag can have as many or as few things below as you want to include.  Below are some common things a welcome bag does:
  • It gives guests a little welcome note from the Bride & Groom
  • It provides guests with important phone numbers.
  • It gives an itenerary of what's going on, where and when.
  • It tells guests where they can go to do things in the area
  • It provides snacks so they don't have to pay for anything from their fridge
  • It helps fix pre & post event trama (hangovers, cuts, headaches, stomachaches)
Some brides know all guests are staying over and have their welcome bags go double duty and work as favors as well.  This is a nice thing to give, however I wanted this to be a separate thing for people staying over. Think of your bag as being ingredients to bake a cake.  What do you want that's special to you or matches your wedding theme that would work in the welcome bag?

My Nautical Themed Welcome / Out-of-Town bag Ingredients:
  • Paper lunch bags (yep, just the plain old brown ones you get in a grocery store)
  • A Printer
  • labels (optional)
  • A Welcome brochure - custom made by yours truly.
  • cheddar goldfish
  • swedish fish
  • lifesavers
  • treat bags
  • treat bag toppers
  • Water bottles
  • water bottle labels
  • Green Tea
  • Green Tea packages
  • Hot Cocoa packets
  • Hot Cocoa packet sleeves
  • Ribbon
Instructions:
I designed my own Monogram logo already and created a new file in Adobe Illustrator with the logo, a pretty font that says "Welcome" above the logo and our wedding date under the logo.  I created the artboard size to be the dimensions of a paper bag (I think around 5.25in x 9in).  Modify your working area to match your bag.

Do a test print.  If you printer refuses to take the paper bag and just eats it, move on to printing onto labels and just stick them on the outside of the bag.

Either purchase your own monogramed labels from a company that prints customized products or use printable labels and print them directly from your computer.  Remove the current labels on the bottle and stick these on your water bottles.

I will soon add a teabag template to this site so you can make your own teabag cases.  You could also simply purchase customized teabags to your bags.

Cocoa packet templates will also be available soon.  These are perfect for the fall or chilly winter months.  These can be purchased customized for your wedding as well.

I got my treat bags at Target.  You can get yours here if you need some.  These are little plastic bags perfect for fillings will candy, cookies and other treats.  I filled each bag with either cheddar goldfish, lifesavers or swedish fish.  I made little paper toppers to close up the bags with the title to match the ingredients.  The life savers said "Lifesavers.  Open in case of emergency"  The swedish fish said " Fresh caught Swedish Fish" and the Goldfish said "Goldfish Fish Bait".  You can attach with clear tape or staple the toppers to the bags.

I added my welcome brochure to the bags.  I had custom made these and included important phone numbers (hotel, taxi, hospitals, etc.), great local spots, a link to upload photos, a welcome message for guests and a Hangover helper guide for people recovering from a night of too much fun.  Check out my brochure here

Once you've got all your "ingredients" together, start assembling the bags with your goodies.  Each one of my bags has a welcome brochure, snacks, water, tea & cocoa.  You can also add things like local maps and a postcard.  Fold over the top of your bag and punch a hole.  Tie your ribbon through the hole.  Deliver your box to the hotel front desk and ask that your wedding guests receive their bags during check in.

 Really want guests to feel appreciated.  Provide some food for breakfast the next day or pamper them with a post-wedding bruch at a local restaurant.


Aug 30, 2011

Vintage Love: Pretty handmade packaging & Free Tags


image source: wedding wire

Looking to do something nice for your hard-working Bridesmaids?

  Reward them with a thoughtful gift and pretty packaging.  My inspiration here was Shabby Chic and I just loved these sweater wrapped gifts.

doiliesTo  make a similar gift for my bridesmaids I used pink and white tissue paper to wrap the gifts, small , twine & made tissue paper flowers

I embelished the flower centers with rhinestones for a bit of bling.  To tie the entire vintage shabby chic look together I made these pretty tags to go onto the gifts with a note that reads,

"as you get ready today and put on your jewelry, make a wish.  let it remind you i am so grateful for your presence in my life.  thank you for standing with me on this special day, as you have so many times before!".  I hope my Bridesmaids will love opening their gift as much as I enjoyed making them.

What's the surprize inside?  Swarovski earrings for the girls.  I'll give my gifts to my girls during our rehersal dinner.

Want to make your own tags for your bridesmaids?  I've created a template for you.  Just add in the names of your bridesmaids and Maid of honor.  Punch a hole in the top and attach with a pretty ribbon.  Please remember that this template is for personal use only and is copyright posh-parties.

Jun 2, 2011

DIY personalized tealight holders

Want to spruce up basic tealight holders or personalize them for your next event? Here's a quick little how-to video on just that.   This is also a very budget friendly project and something for beginning DIY crafters!

What you'll need:
Directions:
  • Make sure your tealight holder is prepped and clean.
  • Wrap your desired ribbon around the tealight and mark off the diameter.  Cut subsequent ribbons the same length.
  • To attach either use glue dots or double sided tape.  For a permanent hold use super glue or a glue gun.
  • You will have seams after wrapping the ribbon around.  To hide these either add some cute detail like buttons, jewelry findings or a paper monogram.  I printed a sheet of monograms I created and attached with double sided tape.

Jun 1, 2011

DIY Wine Bottle Labels - It's freebie time!

Fabulous Wine Labels for a Bridal Shower! :  wedding wine bottle labels labels wine shower bridal shower blue gold white bridesmaids inspiration diy Gifts

We just celebrated my friends Bridal Shower a couple of weeks ago.  I had several DIY projects going on including tissue paper flower balls, wine labels and a Best Wishes Display.

The Ultimate Bridal Shower Idea Book: How to Have a Fun, Fabulous, and Memorable PartyI created the above labels in Adobe Illustrator with the Date of the shower.  We gave away the wine bottles as gifts to guests that won the "toilet paper dress" game and the "guess how well the bride knows the groom" game.

I simply printed them out on plain letter paper and cut them out, peeled or soaked off the current label on the wine bottles and taped the labels onto the bottle with clear tape.

If you want the labels, I've created a .pdf that you can edit with your own name and date.  Please remember that this is free for PERSONAL USE ONLY.  Please do not resell or use this for commercial purposes. You can download the PDF here.


Mar 23, 2011

Gear for your Wedding Party


Are you hosting the Bachelorette party for your friend?
Or are you one of the Groomsmen and want to get a funny gag gift for the groom?

Why not head to CafePress to grab the perfect items for your gang?  From Girls Night Out to Game over shirts, you're bound to find exactly what you're looking for.

They don't just sell clothing here. Grab a mug, shot glass or a tote (among other things you can find on the site).

Got a Bridezilla on your hands?
Let her show when the groom should keep away with this tank top.

Visit this shop and others by clicking here

Feb 6, 2011

Cookies and Milk

What food does everyone love and remember from their childhood as a delicious treat?  That would be cookies & milk. Nothing quite beats a cold glass of milk paired with some warm yummy chocolate chip cookies straight from the oven.  If for nothing else, your house smells delicious after.

Your guest will appreciate it too if you give them a little treat. Whether it's your favor to your guests, or boxed up as a midnight snack for out-of-town guests to take away with them, everyone loves cookies and milk.

Some brides might even forgo the cake and go straight for a dessert buffet/bar, of course, including the classic cookies.

Cookie Buffet DIY how to:
Make your batches of cookie dough 1 week in advance and freeze.  The day before, place in the fridge to thaw, then proceed to bake.  Get lots of pretty dishes to serve your cookies in.  Make sure to mix up heights by placing some cookies on pedestals. Use doilies and other pretty papers to place cookies on. 

Grab some glass milk bottles filled with 1%, whole, chocolate and even strawberry if you're feeling wild. Place them in a tub filled with ice and you have a perfect treat for your guests!

Nov 6, 2010

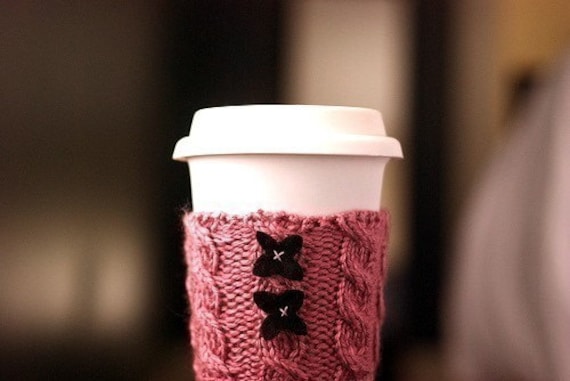
Snuggle up with this cute idea for a Wedding Favor


I am totally in love with this cute coffee cozy from WaysideViolet on Etsy. I would love to give these as Wedding Favors for my guests. How cute and different would that be!

If you wanted to really give a cute and personalized gift, you could pair it with a porcelain mug that has your wedding monogram on it. Or you could sew in your monogram into the coffee cozy.

This gift works best for fall and winter weddings or weddings with a java / tea theme.

Aug 27, 2010

DIY Will you be my bridesmaid cards

Your wedding is a special event and you should carefully decide who you want to have be there for you when you need it most. I helped two of my really good friends when they got married with their pre-wedding decorations, invitations and other needs even though I wasn't a bridesmaid.

The problem was they selected bridesmaids that they felt obligated to pick, not ones that were really good friends. One of my friends, Erica I remember was in tears. She had 300 invitations to make and all her bridesmaids were MIA. I offered to come over that night and help her. It really upset me that her bridesmaids could ditch her like that.

Another friend I helped with all her table decorations and bouquets. She had bought fake fall flowers over time and we spent the night putting the bouquets and centerpieces together. Its a fun bonding experience. I don't understand how you friends can ditch you?

My point is that you should carefully consider who you choose as your bridesmaids and let them know from the beginning what their duties are. You don't want them to be unprepared for the responsibility and the costs involved in being a bridesmaid.

Being a bridesmaid should be fun and exciting as well. Because I wanted to ask my bridesmaids and give them a little keepsake I decided to make up little dress cards in the color scheme I'm thinking about. I've seen dress cards on places like etsy, but felt the colors weren't exactly what I wanted. They also can get a bit pricey, especially when you get into shipping.

So I marched myself down to AC Moore to pick up some tools to make my cards & then went to Jo-ann fabric to get my fabric for the dresses.

What I used...
1 package of folded plain cards $2
1 mini glue gun $5
1 pack of glue gun sticks $2
1 piece of brown satin reminent (found it in a bin) $3
1/4 yard of pretty sparkly dusty rose fabric $3
1 roll of brown ribbon $1
1 package sparkle embellishments $1

Technique
I just freestyled drawing my dress shape on the fabric. If you aren't good at drawing then find a paper doll dress shape you like online, print it, cut it out and trace around it on your fabric on the backside in pen or pencil.

Iron your dress down if needed.

Iron the dress if needed
figure out where you want to place your dress on the card and glue down with a gluestick if you have one. If not, lightly tap glue gun dots onto the paper and press your dress ontop. If you put too much, you'll see the glue drops through the fabric.

Then I decided I wanted the pink sparkly fabric ontop of the brown, but wanted you to see a "wrap-dress" sort of look so i placed the sparkly fabric on top of the top part of the brown dress and then drew where i should cut the pink fabric(leaving a small bit of extra around to tuck). I then cut the pink out and glued it over the brown fabric, tucking the edges under so they weren't frayed.

Onto the bottom of the dress. I sort of freestyled this as well. I cut long strips that were short in height and then got increasingly taller as I cut them. I think I did a total of 3 strips of fabric. Lets say 2", 3" and then 4". I took the first 2" strip, cut it in half and tightly accordion folded it. I glued the first tightly acordian folded piece from the left edge of the "hip" to the center of the dress. Then I took the other piece I cut and did the same thing except I glued it from the right side of the hip to the center.

Then I took the slightly thicker piece (lets say 3") cut it in half again and accordion folded (slightly looser than the first time) it and glued it underneath the first 2" piece from left to center. Then I repeated this process with the piece I cut in half going from right to center.

The last piece and tallest piece I kept in tact. I took the left edge and glued it underneath the 3" piece and then very loosly accordion folded it and glued it as I went over to the right hand side of the dress. The main part of the dress was done, but it looked kind of blah.

Time to embelish! I took a small piece of the brown trim and glued it to the waist like a belt. Then to make the belt look like it was tied I took another small piece of trim and folded it in half and glued it down to the corner. It needed some sparkle, so I glued a tiny star embellishment (found in the scrap-booking section) to the belt. Viola! you have a super-cute card.

I still think the card looks kinda plain, so I'm planning on printing out crowns and gluing them above the dresses. For the inside of the card I'm going to have my mother write "Will you be my Bridesmaid" since she has caligraphy-style handwriting.

Enjoy and have fun making your dresses!

You can also embellish your dresses with beads, feathers and other fun things. Don't be afraid to try other dress styles as well!